How to clean and handle optics?
Optical coated and uncoated surfaces, when cleaned, require wet contact methods. The basic solvents (extra-pure water-free class) used to clean optical surfaces are
- Acetone [also called 2-propanone, dimethyl ketone, propanone (C3H6O)],
- Isopropyl alcohol (IPA) [also called 1-propanol, isopropanol (C3H8O)],
- Ethyl alcohol [also called ethanol, grain alcohol (C2H6O)],
- Ethyl acetate [also called ethyl ethanoate (C4H8O2)],
- Butyl acetate [also called butyl ethanoate (C6H12O2)],
- Methyl ethyl ketone (MEK) [also called butanone, 2-butanone, methylpropanone, ethylmethylketone, methylacetone (C4H8O)],
- Methylene chloride (MEC) [also called methylene chloride, methylene dichloride (CH2Cl2)],
- Toluene [also called phenylmethane, poluol, anisen (C7H8)], and
- Methanol [also called methyl alcohol, methyl hydrate, wood alcohol, wood naphtha or wood spirits (CH4O)].
The most commonly used solvents are acetone, isopropyl alcohol, and ethyl alcohol. The American Military Specifications (milspecs) for coating durability demand “solubility and cleanability” in trichloroethylene, ethyl alcohol, and acetone. The quotation in Fig. below comes from MIL-C-48497A (1980), “Coating, Single or Multilayer, Interference: Durability Requirements for.”

The quotation in Fig. below comes from MIL-PRF-13830B (1997), “Optical Components for Fire Control Instruments; General Specification Governing the Manufacture, Assembly and Inspection of.”
Note that the more recent publication does not mention trichloroethylene.
This is because trichloroethylene has been classified as a carcinogen and is no longer used to clean optical elements. Other recommended solutions (according to some articles) include
- 60% acetone and 40% methanol,
- 50% isopropyl alcohol and 50% distilled water with a couple of drops of dishwashing liquid, and
- Distilled, deionized water.
If approved by the manufacturer, fingerprints and large dust particles can be removed by immersing the optic in a mild solution of distilled water and optical soap. The optic should not remain immersed any longer than necessary to remove the contaminants. Afterwards, the optic should be rinsed in clean distilled water.
Ethyl alcohol (ethanol) is sometimes the preferred solvent because it evaporates faster than isopropyl alcohol (IPA or isopropanol) but slower than acetone, and it readily dissolves fingerprint oils. However, some stains can be removed only by acetone. Some experts use a mixture of acetone with ethanol or isopropanol in order to remove a wider range of stains.
Supplemental materials and accessories
- Wooden storage boxes to protect all sides of the optical item with sponges attached to the box’s inner walls.
- Plastic storage boxes designed specially to store optical elements in such way that there is no contact between the box and the coated surfaces.
- Protective bags made of polyester provide soft protection for the optical elements.
- Tweezers (Teflon or stainless steel with or without carbon fiber tips) for holding small elements.
- Finger cots (powder-free latex) to protect optical surfaces from oily or dirty fingers or hands.
- Gloves (powder-free latex or lint-free cotton) to protect optical surfaces from oily or dirty fingers or hands.
- Dust bulb blower (with or without a built-in lens brush) to blow or brush away small dust particles.
- Canned dry-air duster to blow away small dust particles with more force than the bulb blower).
- Solvent dropper bottles for placing solvent cleaner on lens tissue for the drop-and-drag cleaning method.
- Solvent pump dispensers for storing and dispensing cleaning agents to clean optical surfaces.
- Cotton swabs (lint free) to clean small areas of optical surfaces (only if soaked with a wet cleaning agent).
- Lens-cleaning paper and tissue for cleaning optical surfaces (only if soaked with a wet cleaning agent).
- Stainless steel hemostat for holding folded tissue when cleaning optical surfaces (only when the tissue is soaked in a cleaning agent).
- Magnifying glass or loupe for better visual inspection of cleanliness of optical surfaces after cleaning.
- Fluorescent, cool-white light source with a black background for better visual inspection of cleanliness of optical surfaces after cleaning
Cleaning and handling procedure
The following steps for cleaning and handling optical elements are very important and critical to their functionality in later assembly and testing. The steps provided here are clear, but knowledge and experience are also crucial.
After the conformity of various parameters has been verified, it is the inspector’s duty to leave the element clean, so the inspector must be aware of the correct cleaning procedures. The steps are as follows:
- Prepare a clean surface and a clean and soft platform to place the component on, if needed.
- Prepare all needed materials and accessories
- Ensure that your hands are clean. If not, clean them.
- Wear clean finger cots or gloves to prevent contact between the hands
(which might be dirty and oily despite previous cleaning) and the item to be cleaned. The decision whether to cover both hands depends on the practitioner’s experience and the size and contour of the lenses. In some cases, the lens can be held on the ground surface with clean, bare fingers/hands. If the clear aperture (CA) of the surfaces reaches the edges of the surface, do not take risks: cover all fingers or both hands.
Skin fume acids might cover the optical surfaces close to the
intersection of the finger and the optical surface, and will require
additional cleaning. - Hold the component and test it visually for the existence of stains, dust, dirt, and other foreign particles.
– If there are any foreign particles, remove them by blowing clean and dry air from dust bulb blower (with or without a built-in lens brush) or from a canned dry air duster.
– Afterward, if there are stains or dirt, move on to the next step. If the surfaces are clean, do not try to clean them again—it is a waste of time. - The “wipe technique”: Immerse a piece of lens-cleaning paper or tissue in the cleaning solvent and, without any excessive pressure (a matter of experience), wipe the surface gently. The motion should be continuous with constant speed. The cleaning direction may involve a spring (or S) motion, starting from one point at the edge and ending on the opposite side while pulling the wet paper or tissue outward, or by starting at the center of the surface and moving toward the edge of the surface in an outward spiral.
- Some recommendations prefer to clean an optical surface in the direction shown in Fig.below,
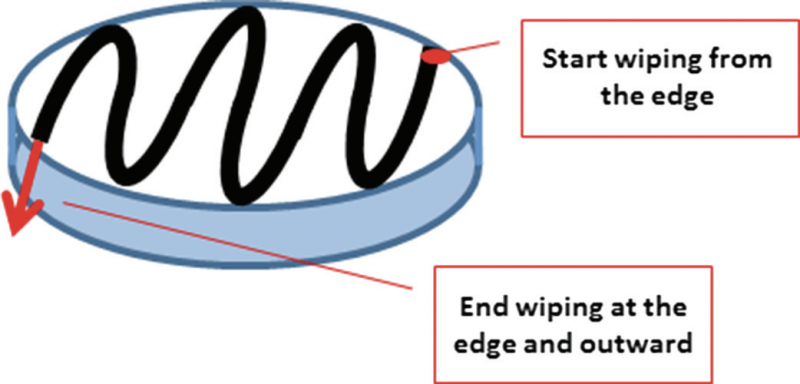 whereas others use the direction shown in Fig. below.
 Practitioners will learn from experience which they prefer, but both directions are acceptable and can achieve good results.
 - The “drop and drag technique”: This technique is ideal for light cleaning of un-mounted, flat-surface elements. Place the element on a clean and soft surface; after blowing off any dust (if needed), lay a piece of clean tissue over the surface to be cleaned, deposit some drops of the cleaning solvent from a solvent dropper bottle, wait a few seconds for the solvent to spread over the optical surface, and then drag the tissue slowly across the optic’s surface. Another method involves holding the clean tissue above the optical surface, depositing drops of cleaning solvent, and then laying the wet tissue on the optical surface. Wait a few seconds for the solvent to spread over the optical surface and then drag the tissue slowly across the surface. If the item is large enough,
- The “brush technique”: This technique is suitable mostly for small elements. A lens tissue is folded so that the fold is as wide as the surface to be cleaned. The outside edges of the tissue may leave lint, so always place the edges of the folded portion away from the fold that comes in contact with the surface. With a hemostat, grip the folded tissue parallel to and near the fold . With this “brush,” soaked with cleaning solvent, apply slight pressure on the surface to be cleaned and slowly wipe the surface from one edge to another. Before wiping, shake off any excess cleaning liquid from the brush.